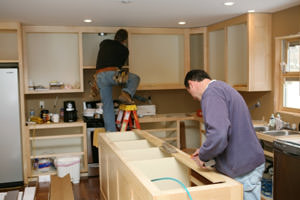
Eden Renovations

Kitchen Fitters

Fitting the worktop / countertop

By / Kitchen Fitters / Comments Off on Fitting the worktop / countertop

Fitting the worktop

Fitting a straight run of worktop is reasonably straightforward. However, joining a two lengths to take a worktop a round corner requires more care, as the join needs to be perfect to create a continuous, flat finish. Corner joint steps are tipple to use, but don not provide the best finish. Better joins can be achieved if you let us use our worktop joining techniques provided by our professional worktop fitters.

Cutting a worktop length (laminate worktops, earthstone worktops or synthetic stone worktops and real wood worktops)

For a straight run, we cut the worktop to the right length, including an overhang of about 25mm (1 inch) at each end.

Joining a worktop

If the worktop has to turn to a corner, it is necessary to join two lengths. At this moment, options to joining worktops are limited by the material the worktop is made from, and whether its profile is square or rounded. The best technique and the most we use to join two lengths is the biscuit joint.

Securing a worktop

Once the worktop has been fitted, it will be secured in place using screws inserted through the worktop fixing brackets that are attached to the units and fixing wail.


Finishing Worktops

Laminated worktops

These often have unfinished edges that require covering with laminate strips supplied by the manufacturer. The strips can sometimes be ironed on, but others, will need contact adhesive. Once the strip is fixed in place and any adhesive is dry, the edges are trimmed flush using a craft knife.

Synthetic stone worktops

Sawn edges of some types of synthetic stone can be sanded smooth.

Solid wood worktops

These are the best sanded smooth, then stain-protected using the oil recommended by the worktop manufacturer. The surfaces has to be painted with several coats of oil, removing any excess with a dry cloth. Sometimes, extra oil may be required at intervals to maintain the finish.


Assembling flat-pack kitchen units

By / Kitchen Fitters / Comments Off on Assembling flat-pack kitchen units

Assembling flat-pack kitchen units

Kitchen units are one of the most popular forms of flat-pack furniture. They come in a wide array of sized and configurations, allowing to our kitchen fitter to plan and assemble a fully fitted kitchen clean, easily and fast.

Starting by unpacking and identifying all the components, we carry out a dry run, fitting the components together. Once the assembly began, glue will be applied to all exposed dowels and also, the mating panels will be brought together.

Installing base units

The work will start in the corner of the kitchen, by setting out the corner unit in position. The unit legs allow us to set out the level, therefore, the rest of the cabinets will follow the corner unit levels.

Installing the wall units

A horizontal line on the wall will be marked to indicate the level of the bottoms of the wall units above the datum line, using a spirit level. Most of the wall units are mounted using a fitting that fits inside of the top corners of the cabinets and hooks onto a special bracket on the wall. The fitting incorporated an adjustment block that allows to adjust the level of the units precisely.


Planning your Kitchen Layout

By / Kitchen Fitters / Comments Off on Planning your Kitchen Layout

Planning your Kitchen Layout

Planing a kitchen is a fairly complex task because of the many different factors that need to be considered. It is also an area in which strict budgeting is necessary as much of the cost of a kitchen is not in the units, but in the time and cost of the installation process, which of course, this will also depend on how much you wish to invest.

Appliances

Decide what appliances you are going to have in the kitchen. A kitchen should contain a hob and oven, a fridge, and a sink. Other options include a microwave, a dishwasher, a washing machine, a separate freezer, or a combined fridge-freezer. Of course, not all of these have to be in the kitchen – garages and utility rooms can often house appliances.

Most food preparation in the kitchen is related to the cooker, the sink and the fridge. Generally a triangular layout of the three essentials is considered ideal – access is straightforward, and there is room for preparation or storage beside each area.

It is best not to position your fridge next to your cooker as the fridge will have to work harder because of the warm air around it when the cooker is on.

If you want an island unit in your design, it is best if it does not block your route between sink, fridge and cocker. An electrical supply for an island unit can be run underfloor easily, especially if you are fitting a new floor anyway. However, plumbing for an island unit is more difficult because the gradient of the waste pipes need to be accommodated beneath the floor, and this is often impractical in many cases.

Storage

Storage for food, utensils, and cleaning products is useful in a kitchen. The greater the number of units, the more crowded a kitchen will feel, but too little storage space may be frustrating, so a compromise will usually need to be sought.

Worktops

Worktops are essential for both food preparation and to accommodate electrical appliances such as kettles, coffee makers and freestanding microwaves.

Worktops can also provide an eating space, in the for of a breakfast bar, for example. The underside can be left open, or peninsular units can be fitted below. In the latter, a wide section of worktop provides a large overhang.

Using your supplier

Once you have formulated some ideas about what design and style you are looking for, the next step is to speak to your supplier. The supplier will take accurate measurements of the room and produce a computer-generated design to give you a good idea of what your kitchen will look like.

Some manufactures have kitchens in stock, but with others may take weeks or even months to come through. Bear this in mind in overall planning when considering any necessary structural change requirements and re-routing of services.

We know how crucial is coordinating the delivery of materials to your project and we advise you to plan well ahead and confirm delivery dates.

Typical Kitchen Layouts

In smaller kitchens, the size and shape of the room will often dictate the layout. In larger rooms there are more options to consider. Typical kitchen unit layouts are single run, L-shaped, or U-shaped, and many include island units, breakfast bars, and dining areas. Most kitchen variations on one of these examples:


[four_col_col1] [image_with_text image_link=’http://edenrenovations.co.uk/wp-content/uploads/2013/11/l-shaped-kitchen.png’ image_title=’L-Shaped Layout Design’ lightbox=’no’ link=” target=”]

L-shaped layout

This layout has units along all or part of two adjoining walls. In a larger kitchen this may allow room for a dining area in the kitchen. This layout provides ample storage space and floor space and is therefore ideal for a busy family life.

[/image_with_text] [/four_col_col1] [four_col_col2] [image_with_text image_link=’http://edenrenovations.co.uk/wp-content/uploads/2013/11/u-shaped-kitchen.png’ image_title=’L-Shaped Layout Design’ lightbox=’no’ link=” target=”]

U-shaped layout

Here units cover three walls, and in a larger room one length of the U may be used as a breakfast bar. In a small kitchen, this layout provides maximum storage and appliance capacity, but standing room is limited. It is always best to keep the fridge close to the door.

[/image_with_text] [/four_col_col2] [four_col_col3] [image_with_text image_link=’http://edenrenovations.co.uk/wp-content/uploads/2013/11/gallery-layout.png’ image_title=’Gallery Layout Design’ lightbox=’no’ link=” target=”]

Gallery layout

This design uses straight runs of units on opposing walls in a narrow kitchen. As in the U-shaped layout on the left, floor space may be limited, but wall space is used to its maximum potential.

[/image_with_text] [/four_col_col3] [four_col_col4] [image_with_text image_link=’http://edenrenovations.co.uk/wp-content/uploads/2013/11/island-kitchen-layout.png’ image_title=’Island Layout Design’ lightbox=’no’ link=” target=”]

Island layout

This type of layout tends to be used either in large kitchens or as a design feature in smaller ones. When appliances are fitted in an island, the “work triangle” theory doesn’t apply. Routing supplies may be tricky with this layout design.

[/image_with_text] [/four_col_col4]